8/4(월) - UI 확인 및 FE 개발 환경 구축 + 깃허브 업로드
두 회차에 걸쳐서 작업한 피그마 UI 화면을 함께 보며 피드백을 통해 수정을 거친 후,
이번 회의때부터 본격적으로 프론트엔드 개발 환경 구축에 돌입했다.
0. Node.js 설치
https://nodejs.org/en/download/current
Node.js — Download Node.js®
Node.js® is a free, open-source, cross-platform JavaScript runtime environment that lets developers create servers, web apps, command line tools and scripts.
nodejs.org
위 링크에서 Node.js 설치를 완료한 후 VS Code를 열어 터미널로 이동한다.
Expo 기반 React Native 앱 개발
1단계: Expo CLI 설치
터미널에서 다음 명령어 입력
npm install -g expo-cli
⚠️error 발생시
- 이 방식은 전역 폴더(/usr/local/lib)에 접근 권한이 필요하므로 sudo로 관리자 권한을 줘야 함
sudo npm install -g expo-cli위와 같이 터미널에 다시 입력하고 사용중인 기기의 비밀번호를 입력하면 설치가 진행될 것임
[이후에도 계속 무언가를 새로 설치할 때 에러가 많이 발생하면 코드 앞에 sudo를 붙여 실행하고 비밀번호를 입력하면 됨]
✅ "added 1302 packages in 15s"
→ 설치가 성공적으로 완료되었다는 뜻
(deprecated 경고들은 무시해도 괜찮음, Expo CLI가 사용하는 일부 패키지들이 오래된 버전이라는 경고일 뿐이라 함)
2단계: 새 프로젝트 생성
expo init sosohaeng-app
*템플릿 설정 -> 처음엔 blank 선택 권장
? Choose a template: › blank (a minimal app as clean as an empty canvas)
⚠️경고 및 주의
실행 결과 중 "Migrate to using: › npx create-expo-app --template" 문구를 발견한다면 :
expo-cli는 구버전이고 deprecated(사용 중단 예정)
→ 이제는 npx 기반의 create-expo-app 사용이 권장된다는 뜻
이땐 다음과 같이 대응하면 됨:
#프로젝트 폴더로 이동
cd sosohaeng-app

#패키지 수동 설치
npm install
또는
sudo npm install (권한 문제 우회하는 방법)

#앱 실행
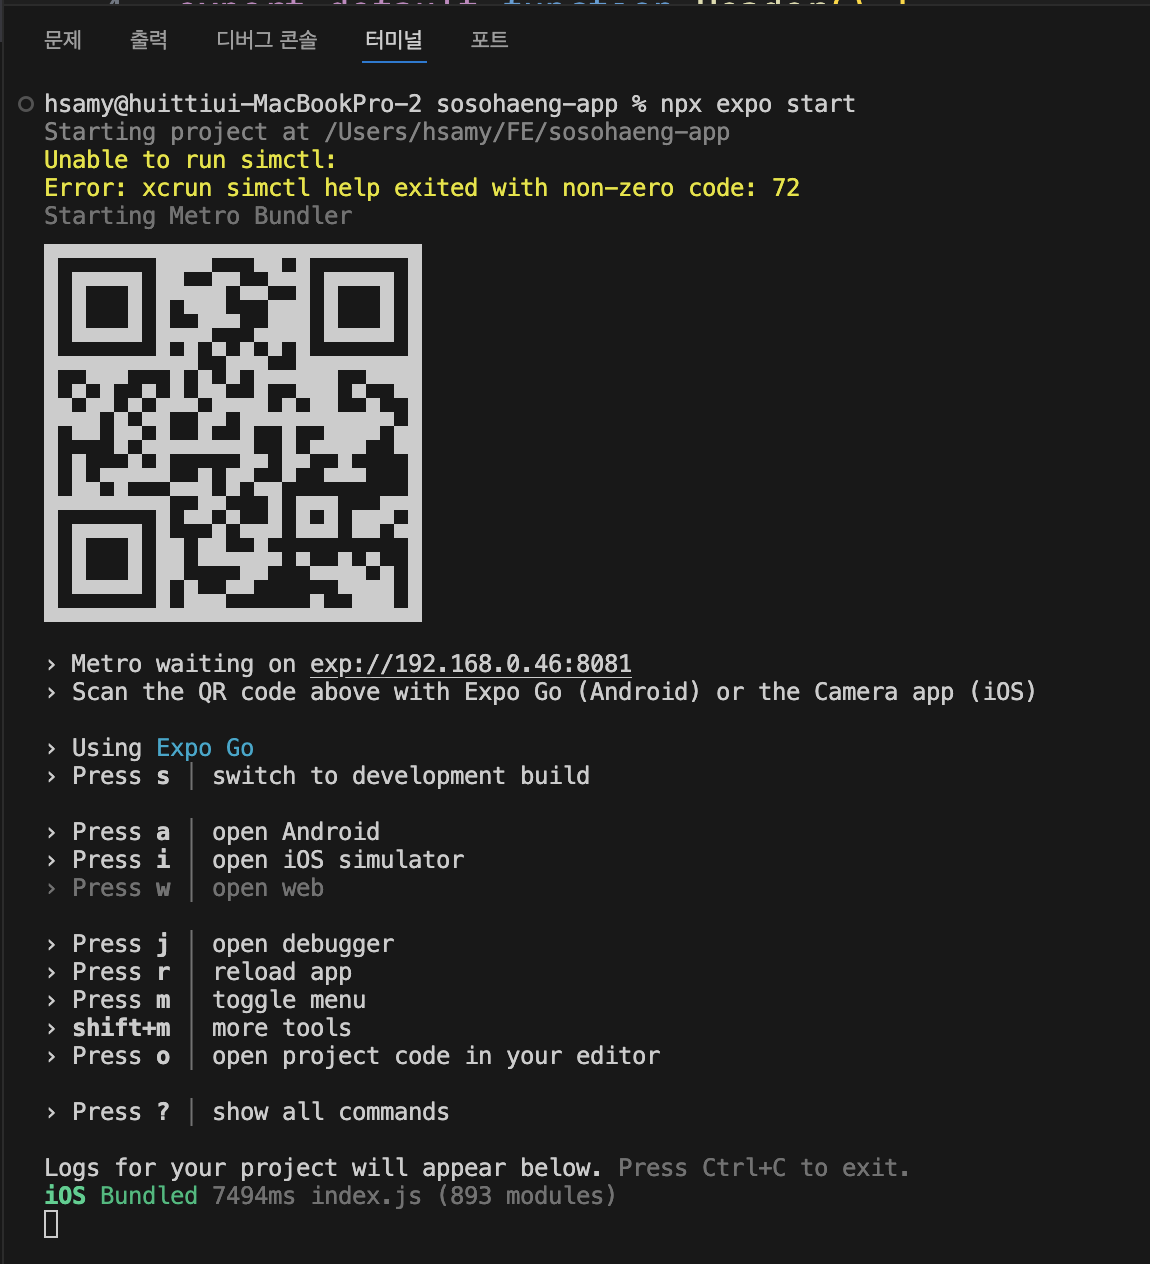
npx expo start
<확인 포인트>
- 터미널에 QR코드 뜨면 성공
- 핸드폰에서 Expo Go 앱 실행 후 스캔
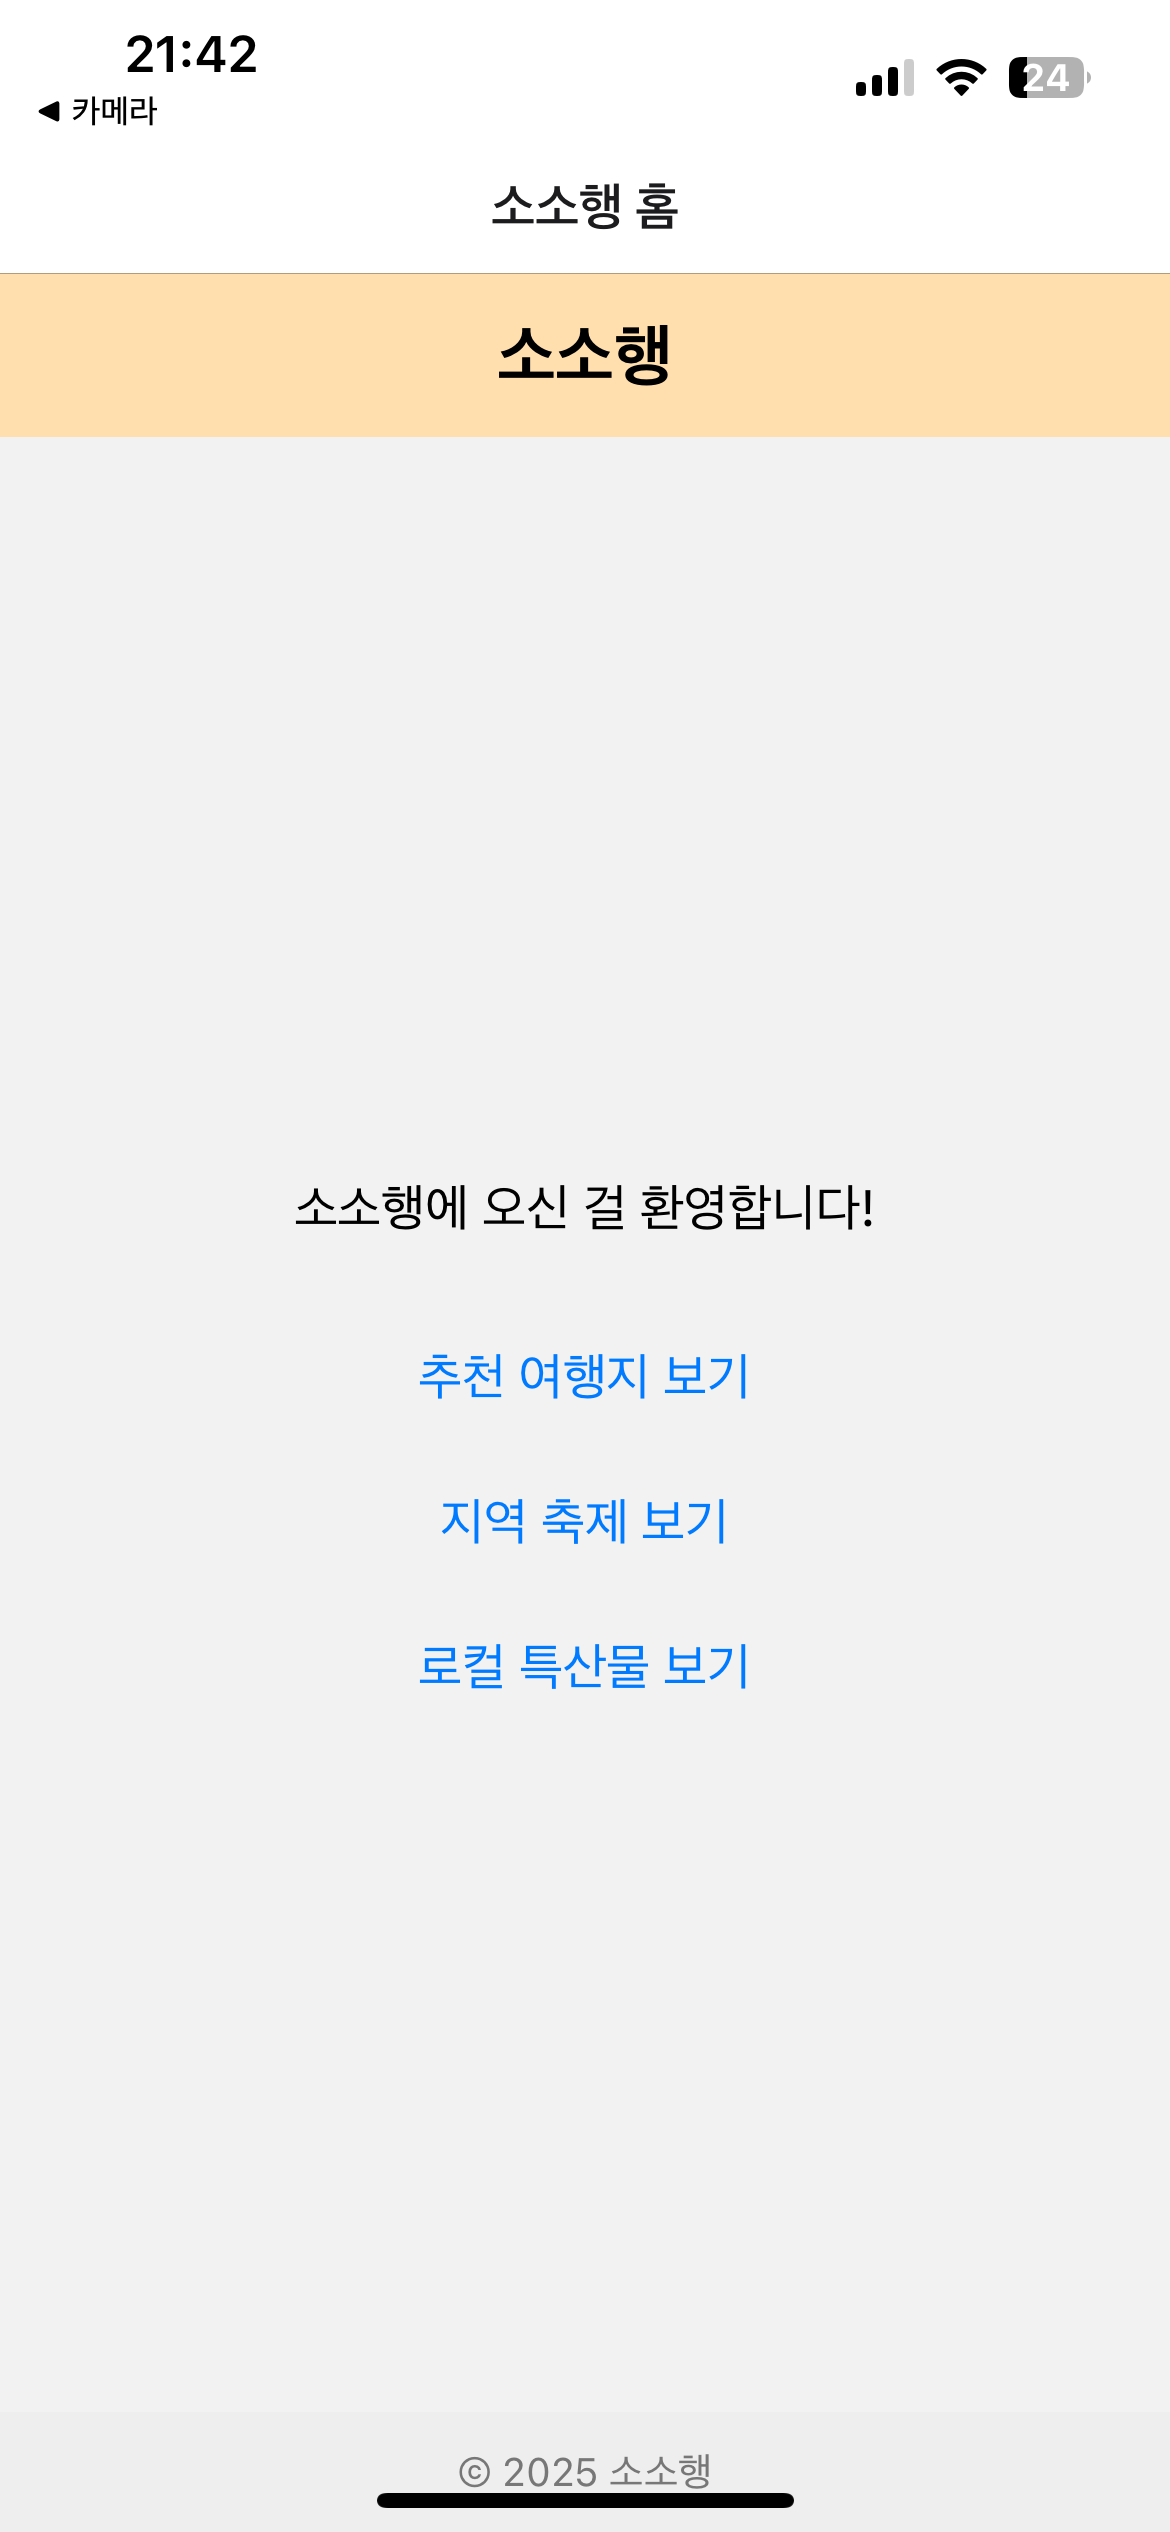
- 소소행 기본 앱 화면 확인!
💡 앞으로는 이렇게
앞으로 새로운 프로젝트를 만들 땐 다음 명령어를 사용:
npx create-expo-app sosohaeng-app이렇게 하면 새로운 Expo CLI를 바로 사용하는 구조로 만들어져서 더 이상 구버전 관련 경고가 안 뜰 것임
3단계: 프로젝트 실행
디렉토리 들어가서 실행:
cd sosohaeng-app
expo start
📱 스마트폰에서 테스트 방법
- 핸드폰에 Expo Go 앱 설치 (iOS/Android 모두 가능)
- 터미널에서 뜨는 QR코드 → 핸드폰 카메라로 스캔
- → 앱이 실시간 실행됨 (코드 수정 시 자동 반영됨)
🔁 웹처럼 즉시 반영되는 Hot Reloading 기능이 기본 탑재!
4단계: 폴더 구조 정리 및 기능별 파일 추가
sosohaeng-app/
├── App.js
├── components/
│   ├── Header.js
│   └── Footer.js
├── screens/
│   ├── HomeScreen.js
│   ├── RecommendScreen.js
│   ├── FestivalsScreen.js
│   └── SpecialtiesScreen.js
*처음엔 모든 코드가 App.js에 있는데, 기능이 늘어나면 screens/, components/, navigation/ 등의 폴더로 분리
7단계: react-navigation 설치
: 화면 간 스택 네비게이션(이동)을 위한 설정
#터미널에서 아래 명령어를 차례로 실행:

#1번
sudo npm install @react-navigation/native

#2번
npx expo install react-native-screens react-native-safe-area-context react-native-gesture-handler react-native-reanimated

#3번
sudo npm install @react-navigation/native-stack
*설치 후 확인
npm ls @react-navigation/native→ 설치가 잘 됐으면 경로와 버전이 출력됨
*만약 2번 줄 설치 중 에러가 뜬다면 :
- 터미널에서 다음 명령어를 실행
#1단계: node_modules 디렉토리 권한 재설정

sudo chown -R $(whoami) node_modules
sudo chown -R $(whoami) ~/.npm

#2단계: ackage-lock.json 권한 재설정

sudo chown $(whoami) package-lock.json

#3단계: 다시 Expo 설치 명령 실행

npx expo install react-native-screens react-native-safe-area-context react-native-gesture-handler react-native-reanimated


**팁: 모든 권한을 한 번에 초기화하고 싶다면?

sudo chown -R $(whoami) .
6단계: 테스트용 화면 구성
App.js
import React from 'react';
import { NavigationContainer } from '@react-navigation/native';
import { createNativeStackNavigator } from '@react-navigation/native-stack';

import HomeScreen from './screens/HomeScreen';
import RecommendScreen from './screens/RecommendScreen';
import FestivalsScreen from './screens/FestivalsScreen';
import SpecialtiesScreen from './screens/SpecialtiesScreen';

const Stack = createNativeStackNavigator();

export default function App() {
  return (
    <NavigationContainer>
      <Stack.Navigator initialRouteName="Home">
        <Stack.Screen name="Home" component={HomeScreen} options={{ title: '소소행 홈' }} />
        <Stack.Screen name="Recommend" component={RecommendScreen} options={{ title: '추천 여행지' }} />
        <Stack.Screen name="Festivals" component={FestivalsScreen} options={{ title: '지역 축제' }} />
        <Stack.Screen name="Specialties" component={SpecialtiesScreen} options={{ title: '로컬 특산물' }} />
      </Stack.Navigator>
    </NavigationContainer>
  );
}
components/Header.js
import React from 'react';
import { View, Text, StyleSheet } from 'react-native';

export default function Header() {
  return (
    <View style={styles.header}>
      <Text style={styles.title}>소소행</Text>
    </View>
  );
}

const styles = StyleSheet.create({
  header: {
    padding: 16,
    backgroundColor: '#ffdfae',
    alignItems: 'center',
  },
  title: {
    fontSize: 24,
    fontWeight: 'bold',
  },
});
components/Footer.js
import React from 'react';
import { View, Text, StyleSheet } from 'react-native';

export default function Footer() {
  return (
    <View style={styles.footer}>
      <Text style={styles.text}>© 2025 소소행</Text>
    </View>
  );
}

const styles = StyleSheet.create({
  footer: {
    padding: 12,
    backgroundColor: '#eee',
    alignItems: 'center',
  },
  text: {
    fontSize: 14,
    color: '#777',
  },
});
screens/HomeScreen.js
import React from 'react';
import { View, Text, Button, StyleSheet } from 'react-native';
import Header from '../components/Header';
import Footer from '../components/Footer';

export default function HomeScreen({ navigation }) {
  return (
    <View style={styles.container}>
      <Header />
      <View style={styles.content}>
        <Text style={styles.text}>소소행에 오신 걸 환영합니다!</Text>
        <Button title="추천 여행지 보기" onPress={() => navigation.navigate('Recommend')} />
        <Button title="지역 축제 보기" onPress={() => navigation.navigate('Festivals')} />
        <Button title="로컬 특산물 보기" onPress={() => navigation.navigate('Specialties')} />
      </View>
      <Footer />
    </View>
  );
}

const styles = StyleSheet.create({
  container: { flex: 1, justifyContent: 'space-between' },
  content: { alignItems: 'center', gap: 12 },
  text: { fontSize: 18, marginVertical: 16 },
});
screens/RecommendScreen.js
import React from 'react';
import { View, Text, StyleSheet } from 'react-native';
import Header from '../components/Header';
import Footer from '../components/Footer';

export default function RecommendScreen() {
  return (
    <View style={styles.container}>
      <Header />
      <View style={styles.content}>
        <Text>여행지 추천 페이지입니다.</Text>
      </View>
      <Footer />
    </View>
  );
}

const styles = StyleSheet.create({
  container: { flex: 1, justifyContent: 'space-between' },
  content: { alignItems: 'center', paddingTop: 40 },
});
screens/FestivalsScreen.js
import React from 'react';
import { View, Text, StyleSheet } from 'react-native';
import Header from '../components/Header';
import Footer from '../components/Footer';

export default function FestivalsScreen() {
  return (
    <View style={styles.container}>
      <Header />
      <View style={styles.content}>
        <Text>지역 축제 정보를 보여주는 페이지입니다.</Text>
      </View>
      <Footer />
    </View>
  );
}

const styles = StyleSheet.create({
  container: { flex: 1, justifyContent: 'space-between' },
  content: { alignItems: 'center', paddingTop: 40 },
});
screens/MarketScreen.js
import React from 'react';
import { View, Text, StyleSheet } from 'react-native';
import Header from '../components/Header';
import Footer from '../components/Footer';

export default function MarketScreen() {
  return (
    <View style={styles.container}>
      <Header />
      <View style={styles.content}>
        <Text>로컬 특산물 마켓 페이지입니다.</Text>
      </View>
      <Footer />
    </View>
  );
}

const styles = StyleSheet.create({
  container: { flex: 1, justifyContent: 'space-between' },
  content: { alignItems: 'center', paddingTop: 40 },
});
7단계: 실행 및 확인
1. 정확한 프로젝트 폴더로 이동
cd sosohaeng-app
2. 앱 실행
npx expo start
❗️실행결과 :
다음 글에서는...
이제 초기 React Native 개발 환경 구축이 끝났으니
이를 활용하여 깃허브에 연동하여 FE 화면을 제작 및 병합하는 과정을 담아보겠다.
'주전공 > 캡스톤디자인과창업프로젝트' 카테고리의 다른 글
| 여름방학 기록(4): BE 개발 시작 | API Endpoint Listup + FastAPI code (0) | 2025.08.17 |
|---|---|
| 여름방학 기록(3) : 깃허브 레포 생성 및 FE 개발 시작, 그리고 API 명세서 작성 | with React Native + Expo GO + Notion (0) | 2025.08.11 |
| 여름방학 기록(1) : 방학 개발계획 수립 및 피그마 UI 제작 (0) | 2025.08.04 |
| 졸프 - 소소행; | 프로젝트 데모용 코드 만들기 (0) | 2025.06.15 |
| 졸프 - 소소행; | 1차 중간발표 준비 | 세부 기획 및 발표자료 제작 (0) | 2025.06.12 |


